

In this practical tutorial, you’ll learn how to create a professional-looking, fully functional website or blog in 5 easy steps, even if you don’t know anything about coding.
From the step-by-step actionable walkthrough to the best tools to use, I’ll show you everything you need to know.
You don’t need to be a tech whiz to do this. Plus, you can do it on a budget.
But before we get to the step-by-step walkthrough, let’s quickly see why you should create a website or a blog.
Why Create a Website or Blog for Your Business?
First off, if you’re looking to start or already running an online business, then owning a website is a no-brainer as it might be a necessary step depending on your type of online business.
It is almost always necessary!
Here’s why:
The Internet is akin to the real estate of a big, bustling city. Your website is like buying a piece of land in that great city and building up a property on it so you have a place for people to walk into and do business with you.
Think of it as your virtual office or digital storefront.
While social media, email marketing, and other digital marketing strategies are essential, a website is in a world of its own. It’s your best chance of establishing professionalism, credibility, and your brand.
About 97% of consumers search for products and businesses online, but over 30% say they won’t patronize an establishment that doesn’t have a website.
A 2023 report reveals that consumers spend an average of 6 hours and 30+ minutes per day online looking for the right website to engage with.

More broadly, a website does the following for you:
- It opens you up to a global audience as anyone from anywhere in the world can access it.
- Compared to traditional advertising methods, a website offers a cost-effective way to market your business or brand, saving you a lot of advertising money and time.
- It brings you closer to your customers and vice versa. It also allows you to educate your customers about your offering.
- It allows you to easily gather valuable customer insights that can potentially help you improve your business, tailor your marketing campaigns, and ultimately make better business decisions.
- Starting a website is one of the easiest ways to bring your business idea to life.
- One website can give you room for multiple streams of income. You can monetize one website in several different ways such as offering services, placing ads, affiliate marketing, selling your products, sponsorships, and more.
- A website provides 24/7 access to information as it is accessible anytime, anywhere, and from any device with an internet connection. This allows potential customers to learn about your offerings, contact you, or make purchases at their convenience.
- A website provides a platform to showcase your knowledge, skills, or experience in a particular field, establishing your authority and expertise.
- A website can be a powerful tool for generating leads and sales and increasing visibility and reach.
- If you’re an offline business, a website will allow you to expand your reach and make more money by selling to online buyers.
5 Steps to Building a Great Website
Years ago, building a website wasn’t child’s play.
If you needed to create a website, you had to hire an agency that would charge tens of thousands of dollars. It was always treated like a big project by the few companies that could afford it.
And the process of building the website? Everything had to be coded manually and could be in the works for months.
Fast forward to today, things have completely turned around — especially with the introduction of website platforms such as WordPress.

Not only has building websites gotten cheaper, but it is also so easy that you can do it even if you don’t know anything about coding.
Here are the steps to follow to build a beautiful, full-standard website or blog.
Step #1: Create a Free Web Hosting Account on Cloudways
The first step is to sign up for a web hosting account.
Every website needs web hosting to go live on the Internet. Web hosting is a service that stores your website files and serves the same to users upon request.
Simply put, when a user wants to see your website, all they need to do is enter your website URL in a browser and your web hosting provider will present the files and content of your site to them within seconds.

SIDENOTE: If you want to explore alternative options, Kinsta and Scalahosting also stand out as excellent choices, offering robust solutions for your hosting needs.
Setting Up Your Free Cloudways Account
Here’s how to set up your Cloudways account:
First, go to Cloudways.
Next, navigate to the signup page and enter your details.

When creating an account with Cloudways, you have the flexibility to sign up using DigitalOcean, LinkedIn, Google, or GitHub (for developers).
Alternatively, you can opt for the traditional method and use your email.
After setting up your account, there’s an extra step to confirm your email address.
The confirmation email should be delivered promptly, so simply click the link inside to activate your account.

Once you’ve entered your new dashboard, you’ll see a page where you can deploy your managed application.
(Managed applications on Cloudways are ready-to-use software packages that you can easily set up to run your site without dealing with complicated technical stuff. A prime example is WordPress—more on this in step #3 below.)
On this page, you’ll see your application and server details and can configure them to your needs. You can pick your preferred application (in this case, WordPress), choose your cloud provider (DigitalOcean, Amazon Web Services, or Google Cloud), name your managed server, specify the server size, and select your server location
The entire process is straightforward, user-friendly, and easy.

This is one key advantage of Cloudways: its remarkable flexibility which gives you granular control over every hosting configuration.
Once you have added all your preferences, click on “Launch Now” to launch your server.

Your server and WordPress install will be ready in no time.

Once ready, you’ll see something like this:

When you open it up, you’ll see your new WordPress installation details such as your WordPress dashboard URL, username, and password:

The whole process is very easy and intuitive.
Cloudways is a postpaid platform. This means you are billed solely for the resources you use.
In practical terms, if you initiate a server costing USD 10.00 per month and use it for only 15 days, your monthly invoice will amount to USD 5.00, reflecting the specific usage duration.
Invoices are generated in the first week of the following month, typically between the 1st and the 6th, and sent to you.
With the ability to pay only for the resources you use, Cloudways offers a budget-conscious approach to hosting services, making it an exceptionally cost-friendly solution.
For added flexibility, Cloudways provides an “Add Funds” feature. This feature proves handy for those opting to make yearly payments. You can prepay funds for up to 12 months based on your current monthly usage. Once added, these funds will automatically offset future invoices until depleted.
Step #2: Pick and Register a Domain Name
When you click on the application URL…

…you’ll notice that your site currently displays the default Cloudways URL.

The next step is to change this so that your site’s URL becomes something like sitename.com.
To do this, you’ll have to pick and register a domain name to connect to your Cloudways application (WordPress).
A domain name is the address of your website, usually shown in the browser URL bar.

With this address, people can easily visit your website or refer other users to it. The typical domain name has an extension such as .com, .net, .org, and so on.
Here’s a look at some of the most notable top-level domain name extensions:

There are over 800 of these domain name extensions, categorized into three main groups:
- Generic top-level domain (gTLD) —examples: .com, .net, .org, .info, .biz, and more!
- Country code top-level domain (ccTLD) —examples: .us, .uk, .ng, .ca, .in, and more!
- New domain extensions —examples: .accountant, .agency, .church, .bike, and more!
While these extensions allow businesses that can’t register the dot com extension to still have the domain name they desire, I highly recommend that you stick with a dot com domain name.
(The only exception is if you’re registering a non-profit organization, foundation, or charity. As such, you can go with dot org.)
Why? Because the dot com extension is the most popular choice, the most used option, and technically the default extension people unwittingly type into their browsers even if your website uses another extension.
This usually results in lost traffic.
Here’s how Internet users view some top-level domains in terms of trustworthiness:

The higher the level of trust a URL has, the easier it’ll be to build a brand with it. Also, a highly trustworthy URL is more likely to be linked to, clicked on, and shared.
The above ratings clearly show that the dot com extension is the most trusted URL.
Apart from trustworthiness, another reason why dot com is worth your pursuit is that it is more inclusive and the most search engine-friendly of all the extensions.
Whatever extension you decide to go with, you want to ensure your domain name is as short as possible.

You also want to avoid using numbers or hyphens in your domain as it is not the best approach.
Plus, your domain name ought to align with the name of the business, organization, or personal brand you’re registering it for.
For detailed advice on choosing the perfect business name, see my ultimate guide to business naming.
Recommended Reading: How to Come Up With a Business Name.
Registering Your Domain Name on Namecheap
Once you’ve decided on a domain name that is relevant to your business, it’s time to register it with an accredited domain name registrar.
There are several domain name registrars online. I have personally been using Namecheap for 10+ years now as they’re one of the most reliable registrars. So, I’ll use them as an example in this tutorial to show you how to easily register your domain name.
First, go to Namecheap.
Once you’re on the homepage, you’ll see a search bar. Type in the domain name you want to register and then click on the search button:

What you’re doing at this point is to see if your chosen name is available or already registered by another user.
Upon initiating the search, you will be taken to the results page where you’ll see different domain name extensions for the name you entered, just like this:

Next, click on the cart icon against the domain name you want to register to add it to the cart.

The dot com domains at Namecheap typically cost about $8.88 per year (+ $0.18 ICANN fee).

After selecting the domain names you want, click on “Checkout.”

The next page will load up where you’ll see your shopping cart information and as well make any adjustments or add more items if you want.
Once you’ve made the necessary adjustments and added items that are important to you, click on “Confirm Order.”

At this point, you’ll be taken to the next page where Namecheap will ask you to either sign in to your account or create a new one.
If you don’t have an account, simply enter a username, your name, email address, and the rest of the information as requested and click on the “Create Account and Continue” button:

Next, you’ll be shown the “Account Contact Information” page. Fill it out and click on “Continue.”

Next up, the “Whois Contact Information” page will load. Complete it and click on “Continue.”

Once your account is ready and you’ve added all your contact information, you’ll be taken to the billing page where you’ll be able to add your payment details.

On the next page, you will be able to complete your purchase. After that, you’ll receive an email confirmation of your order from Namecheap.
You’ve now successfully registered your domain name.
Step #3: Point Your Domain Name to Your Web Hosting Account
You’ve set up your web hosting account. You’ve registered your domain name. How do all these translate into a functional website that people can visit?
Well, it’s time to marry all these stuff together to form your website.
The way to do that? Point your domain name to your Cloudways hosting account.
Don’t worry; it’s easy.
Here’s how to go about it:
On the WordPress installation screen we opened earlier on Cloudways, go to the “Domain Management” tab.
Next, click on the “+Add Domain” button.

On the screen that pops up, enter the domain name you registered and then click to add:

Once you’ve added it, you’ll need to make it the primary domain:

Go ahead and set as primary:

Once done, you’ll see something like this:

To complete this process, there’s only one final step.
First, copy the IP address from the WordPress installation screen:

Head over to your Namecheap dashboard and click on “Domain list.” Next, click on “Manage” beside the domain name you added to your Cloudways account.

Once the next page has opened, select “Advanced DNS” and then click on”Add New Record.”

Select the “A” record:

Next, type the @ sign under “Host” and paste the IP address you copied from Cloudways under “Value.” Remember to save your work.

That’s it. You’ve now pointed your domain name to your Cloudways account.
Your website should now be displaying your domain name instead of the default Cloudways URL.
Step #4: Secure Your Website with HTTPS
Securing your site with HTTPS is crucial as it encrypts the data transmitted between the user’s browser and your website’s server. This encryption ensures that sensitive information, such as login credentials, personal details, and financial transactions, remains confidential and cannot be easily intercepted by malicious actors.
HTTPS builds user trust by displaying a padlock icon and “https://” in the address bar, signaling a secure connection and assuring visitors that their interactions with your site are protected.
Search engines, like Google, prioritize secure websites in their rankings, so having HTTPS can positively impact your site’s search engine ranking, potentially leading to increased visibility and traffic.
HTTPS helps prevent unauthorized modification of data during transit, ensuring that the content users see on your website has not been altered by attackers, thus maintaining the integrity of your site.
Many privacy and data protection regulations, such as GDPR, require the protection of user data during transmission. Using HTTPS helps you comply with these regulations and avoids potential legal issues.
Modern browsers often display warnings for non-secure sites, discouraging users from proceeding. Having HTTPS eliminates these warnings, providing a smoother and more professional user experience.
The Cloudways Platform provides a built-in Free Let’s Encrypt SSL Certificate for all your applications, ensuring your security right from the start. Plus, the Let’s Encrypt Certificate is not only free but also automatically renews upon expiration.
Alternatively, you have the option to use a Custom SSL certificate, which can be purchased from any Certificate Authority (CA) or certificate vendor.
Here’s a quick video tutorial on how to enable HTTPS for your website on Cloudways.
Step #5: Customize Your Website on WordPress
As you’ve seen above, your website is built using a content management system (CMS) called WordPress.
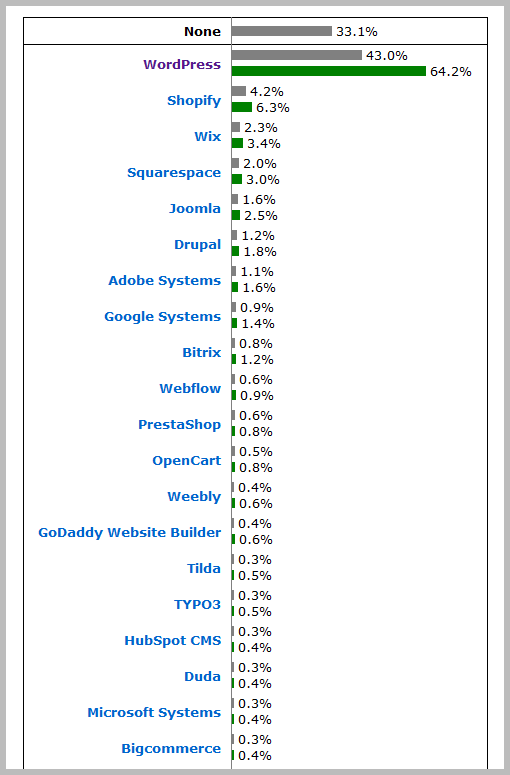
Although there are several content management systems, WordPress remains the most popular and most used one among them.

According to W3Techs, WordPress powers about 43% of all the websites on the Internet. To give you the perspective, the closest one to WordPress is Shopify at 4.2% at the time of writing this.
Whether you’re creating a straightforward portfolio site, a high-traffic blog, or any other type of website, WordPress is more than capable of handling it.
To access the WordPress dashboard of your newly installed website, enter the administrative URL. It usually looks like this:
sitename.com/wp-admin
Upon opening sitename.com/wp-admin, you’ll be prompted to provide your username and password.

This is the username and password you see on your Cloudways application screen under “Admin Panel.”
Enter those details and click “Log In” to get into your WordPress dashboard.

This dashboard is where all of your website administrative work will happen, including designing your site, publishing content like pages and blog posts, adding elements like images and contact forms, approving comments, updating your site, and much more.
Here are some actions to take from this dashboard to customize your new website:
Installing and Setting Up WordPress Plugins
A WordPress plugin is a piece of software that allows you to add functionalities to your WordPress website and blog. There are plugins for pretty much anything you want your website to do.
For example, you can add a store, mailing list, portfolio, social feed, analytics, and so on. In fact, there are over 55,000 WordPress plugins.
Here’s a list of the plugins I recommend you install on your website for standard performance when creating a new website:
| PLUGIN | FUNCTIONALITY |
|---|---|
| Yoast SEO | For optimizing your blog posts and pages to rank high on Google and other search engines |
| W3 Total Cache | For increasing website performance and reducing load times by leveraging features like content delivery network (CDN) |
| Smush | To compress and optimize images so that the site loads faster |
| WordFence Security | For securing your WordPress site and getting regular security updates via email |
| Google Analytics by MonsterInsights | For tracking your website traffic and general performance |
| Contact Form 7 | For inserting contact forms in pages, blog posts, and other areas of your website |
| UpdraftPlus | To back up your WordPress site regularly |
| Google XML | To create a sitemap for SEO purposes |
| Others | Whatever plugin you find necessary |
To install a WordPress plugin, hover your cursor over the “Plugins” tab within your WordPress dashboard and then click on “Add New.”
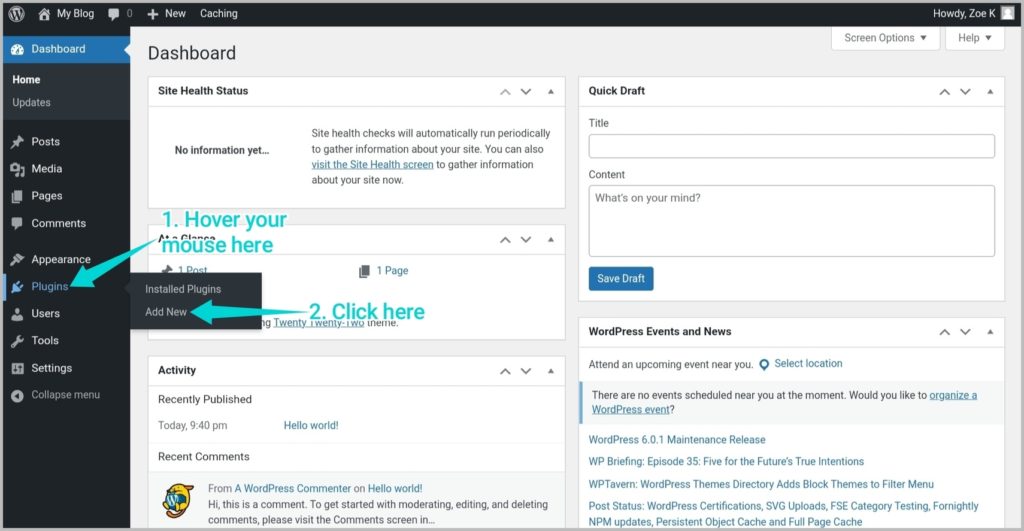
You’ll be taken to the Plugin directory where you can search and add new plugins.
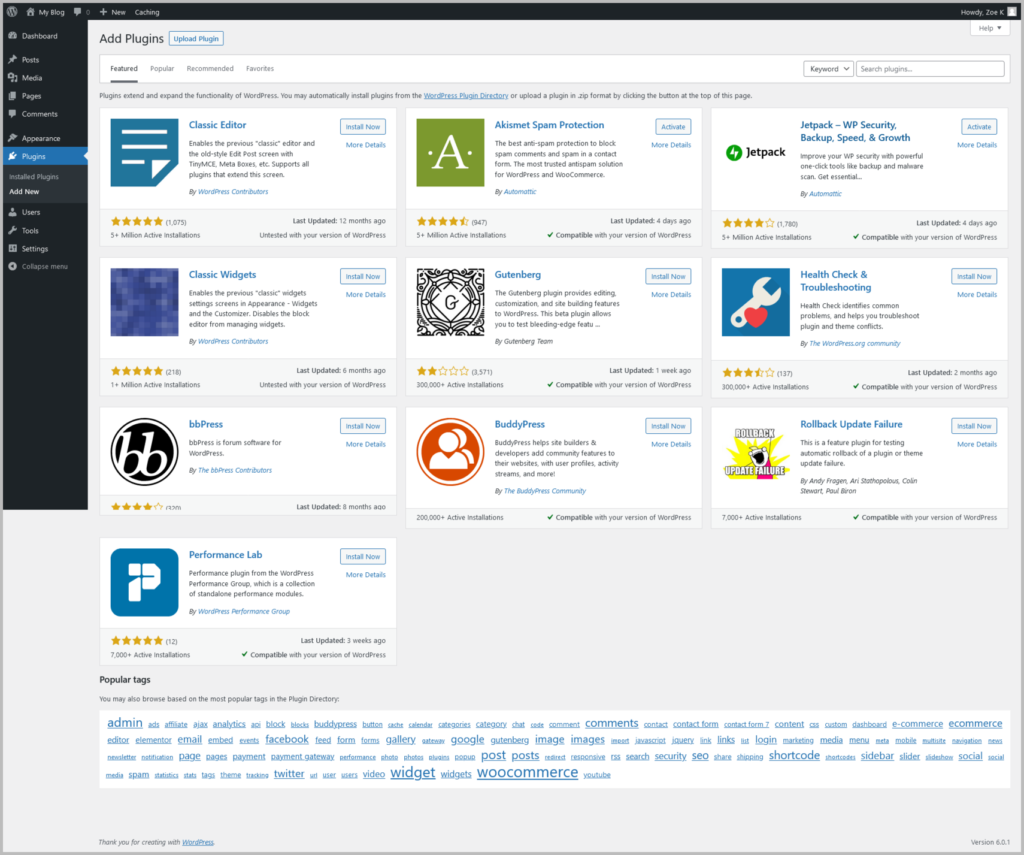
In the search box, type the name of the plugin you want or type in some keyword that’s related to what you are looking for.
Click on “Install Now” and then “Activate.” If required, set it up.

Installing and Tweaking a WordPress Theme
Let’s now get to the fun stuff.
See, the sweet thing about building a WordPress website is that you don’t need to write code.
Want functionality? Install plugins. Want an awesome design? Well, install themes.
A WordPress theme is a pre-made, pre-designed website template, which when installed, gives the site the look and feel it carries.
You can then go on to customize the theme to fit your taste.
To install a WordPress theme, go over to the Theme area. It is found in Appearance > Themes.
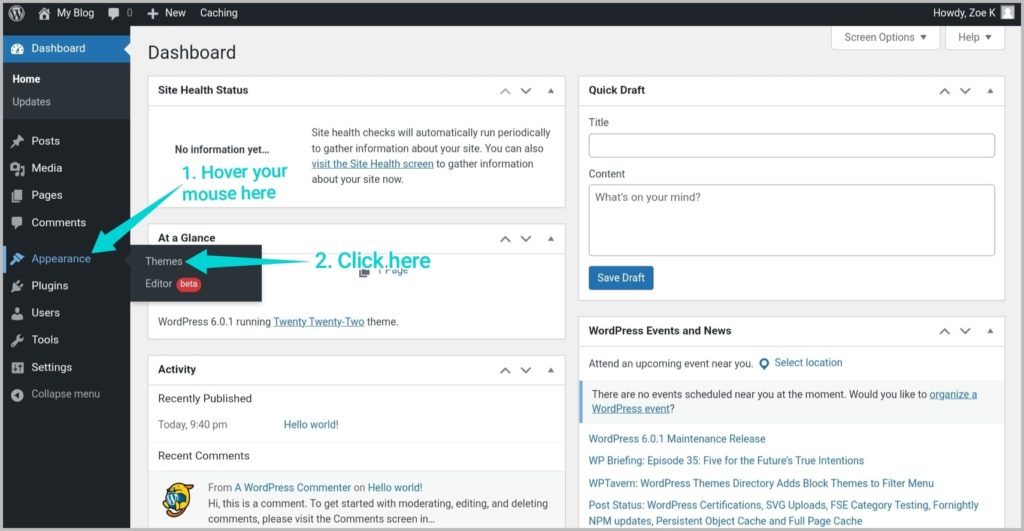
There are usually default themes installed:
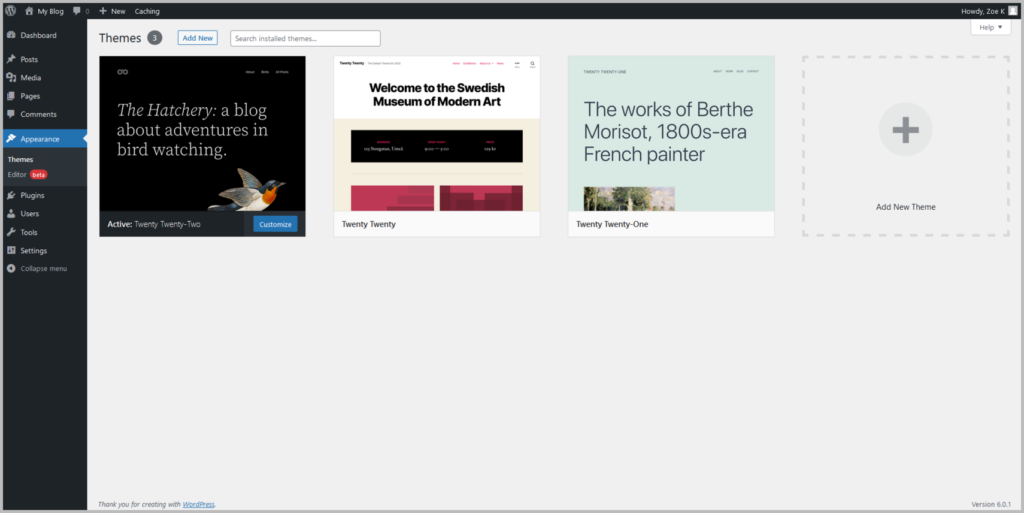
But you need to change the default theme.
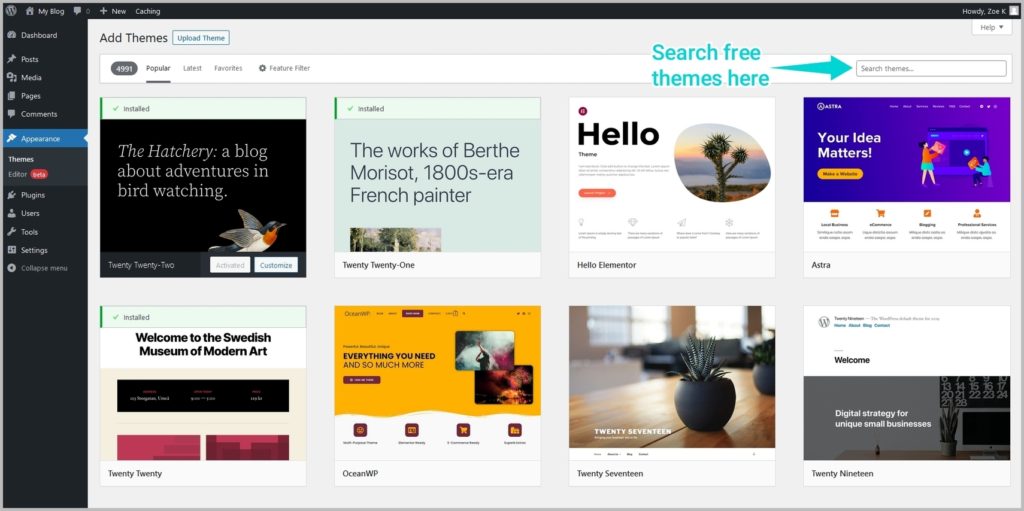
You can install a free theme from the WordPress repository by selecting “Add New Theme” on the themes screen shown above.
Once selected, you’ll be taken to the theme repository page. In the Search themes bar, enter the name of the theme you want to install.
While free WordPress themes offer an accessible entry point for website design, they come with certain drawbacks:
They often offer limited features, restricting your ability to customize and enhance your site’s functionality compared to premium themes. Due to their widespread availability, free themes may result in many users adopting the same design, making it challenging to create a unique and distinctive website, which can impact your brand identity.
Furthermore, free themes may not receive regular updates or dedicated support from developers, potentially leading to compatibility issues with newer WordPress versions or plugins.
This is why it’s better to use a premium WordPress theme.
On the flip side, premium themes offer a significantly more professional and exceptional design. They stand out as more unique and are equipped with an array of features, providing you with extensive customization options to tailor the website to your specific needs.
One notable advantage of premium themes is the enhanced level of support they typically come with, ensuring that you receive timely assistance and troubleshooting when needed.
This level of professionalism, uniqueness, and feature-rich design makes premium themes a preferred choice for those seeking a polished and high-performance website.
Here’s a list of my top 3 recommended premium WordPress themes:
| WORDPRESS THEME | WHY IT ROCKS |
|---|---|
| Divi by Elegant Themes | Divi, a remarkably gorgeous theme, is perhaps the most popular WordPress theme on the web. It has its own incredibly advanced page builder called the Divi Builder. No coding skills needed—just your creativity. |
| GeneratePress | A simple multi-purpose theme that's great for corporate and business websites. It has a clean, minimalist look and design. It also comes with GenerateBlocks, a small collection of lightweight WordPress blocks that can accomplish nearly anything. |
| Hello Theme by Elementor | Built with minimal styling and scripts for maximum speed and design freedom, this beautiful WordPress theme is fully customizable, SEO-friendly, and compatible with Elementor. It has an elegant and stylish design. |
Here’s a how to upload a premium theme (already downloaded to your computer) to your WordPress dashboard:
- On the Themes page, click the Add New button.
- Click the Upload Theme button.
- Select the ZIP file containing your premium theme from your computer.
- Click the Install Now button.
- Once the theme installation is complete, click the Activate button next to the theme name.

Your premium theme is now active, and your website will reflect the new theme’s design and features.
Side Tip: If you download a theme from a third-party source other than the ones recommended above, ensure it is from a reputable and trusted developer to avoid potential security risks.
Now, for advanced WordPress design, you might want to use a page builder.
A WordPress page builder is software designed to create, edit, and customize website layouts without the need for coding. Installed as a plugin, it employs a user-friendly drag-and-drop interface.
Divi Builder by Elegant Themes is an exceptionally powerful, modern no-code visual drag-and-drop website builder that allows you to visually design your website. It comes packaged with the Divi theme as well as some premium-style plugins for email opt-in, social sharing, and more.
In short, Divi isn’t just a WordPress theme, it’s a complete design framework that allows you to design and customize every part of your website from the ground up. With Divi Builder, you can do so much with less technical skills.

Another great option is Elementor Pro. This page builder allows you to create beautiful websites using a simple, intuitive drag-and-drop interface. With Elementor Pro, you have full control over your website and can build your website as you want it.
Eliminator Pro comes with vast professional tools that speed up your workflow and design, allowing you to visually design forms, posts, WooCommerce, slides, and more.

Creating Pages on Your Site
A website is made up of web pages. Each page is created to give specific information that serves a specific purpose on your website.
Although every website is different, there’s often some level of commonality in the titles and purposes of the pages.
The pages listed below are some of the most common ones, but you may not need to create them all.
Often, the first five pages on the table below are usually enough but depending on the purpose of your website, you can add some other pages based on their relevance to your website and business.
Have a look to see the ones you want to add to your website:
| PAGE | DESCRIPTION |
|---|---|
| Homepage | The main page of the website serving as the introductory page and communicating the primary purpose of the site. |
| About page | A page with detailed information about the company or business, and possibly about the business owner(s). It states what the business does, how it does it, the philosophy and story behind why it's doing it, and more! |
| Contact page | A simple page with information through which stakeholders (customers, media, partners, etc.) can contact you. It often might contain your email, physical business address, phone number, contact form, and so on. |
| Blog page | A page displaying your latest blog posts in a chronological format or however you set it. |
| Privacy Policy page | A page with a legal document disclosing some or all of the ways you gather, use, disclose, and manage customers' or users' data. It fulfills a legal requirement to protect a customer's or user's privacy. |
| Service/Product page | If you render services or sell products, you might need a separate page to describe what you are offering. For some websites, a service page is known by different names including Services, Solutions, Hire Me, Work with Me, or even Consulting page. |
| Portfolio page | A page where you display your best work. This is common on service-based websites. |
| Testimonials page | A page for putting forward your social proof, including testimonials, reviews, and customers' success stories. |
| Pricing page | A page for showing your plans and their pricing. |
| Press/Media page | A page where you list your media mentions, press coverage, appearances, events, and interviews. |
| FAQ page | A page where you list frequently asked questions and answer them in advance to help potential users. |
| 404 Error page | A custom page that shows up to your website users if they enter or click on a broken link or go to a page that does not exist on your site. This might help them find what they want. |
| Terms of Service page | Also known as Terms and Conditions or Terms of Use, this page contains rules that a user must agree to before they can engage in using your website. This prevents potential and unexpected claims that might be made against your site because the visitors used the site in a way that is frowned upon. |
| Disclaimer/Disclosure page | A disclaimer page contains legal statements that limit the responsibility of the site per the information it publishes. A disclosure page informs users about something of relevance to them so that they can make informed decisions. |
Aside from having its own unique content, each page usually has its own specific URL based on your domain name. For instance, our “About” page is found at shiftcademy.com/about and the “Contact” page is at shiftcademy.com/contact.
Here’s how to create a new page on your WordPress website:
On your WordPress dashboard, go to Pages > Add New.

Enter the title of the page in the title box and add the content you wish to display on the page.

If you’re not comfortable using the default Gutenberg editor (screenshot above) that uses blocks to edit, you can install the “Classic Editor” plugin (screenshot below) to have a simpler publishing interface.

Once you’re satisfied with your work, click “Publish” to make your page go live.

Creating Your Blog
Want to add a separate blog page to your website?
A blog (web log or weblog) consists of a series of posts often updated frequently with new information about particular topics. It’s what you have at shiftcademy.com/blog.
A homepage is static, showing key information about your business. An example is our homepage here at SHiFTCADEMY.
In some cases, depending on the theme you use, your blog posts are displayed in chronological order on your homepage by default when you launch a WordPress site for the first time. This means your homepage serves as your blog page (keep in mind it’s different for some themes).
But you can create a separate blog page so that you have a great static, conversion-ready homepage different from your blog.
To do this, the first thing you should do is create a new page and title it “Home.” Don’t worry about adding content or customizing the URL.

Create another page and name it “Blog.” On this second page, don’t add content but you can tweak the URL to something like sitename.com/blog.

Be sure to disable the commenting feature on these two pages if you have a commenting plugin turned on.
Next, hover your mouse over “Settings” and select “Reading.”

On the Reading Settings screen, tick “A static page” as opposed to “Your latest posts” for the first option which is “Your homepage displays.”
Just under that, click on the dropdown box to reveal all your pages and select the “Home” page you just created for “Homepage.” Do the same for the “Posts page” but this time choose the “Blog” page you just set up.
Scroll a little down to choose the most number of blog posts you want displayed on the blog page at a time.

Remember to save the changes.
You have now created your blog and can start publishing blog posts by going to Posts > Add New on the WordPress dashboard.
Tweaking Your Site To Your Desire
At this point, your website and blog are ready. But there’s one more thing to do — customizing your site’s elements.
You can do things like:
- Change your site title and tagline
- Add a logo
- Add a favicon
- Tweak the footer content
- And more!
Each of these can easily be done within the WordPress dashboard. However, the specific steps depend on how the theme and page builder you’re using are set up.
For instance, to add your logo, in some themes, you can do that by going to the Customize (Appearance > Customize) screen while for other themes it could be on the Theme Options area.
Just play around with the interface a bit and before long, you’ll be able to figure out what to do.
Once you’re happy with your site, it’s time to launch.
Bonus Step: Maintain and Manage Your Website
Let’s Wrap It Up: How to Create a Website!
But you don’t need to learn coding to create a website. You may not even need to spend thousands of dollars to hire a professional to build a website for you. And you no longer have to wait for months to get your website up and running.
With the current tools available to us today, you can create a beautiful, functional website or start a blog very easily.
In this practical tutorial, I have made the step-by-step workflow simple and clear enough so that you know how to create a website for your business even if you don’t know how to code.
What kind of website are you working on? A portfolio site, an online store, or a blog?

